
As the name suggests this sub-menu will let you create a new contract.
Menu Path: Contract Management >> Active Contracts
Following are the steps to create New Contract in MeRLIN.
1.To create a New Contract, click on Create New Material Contract from the menu under Contract Management. Provide the necessary information in the General Info tab and Click on the Continue button.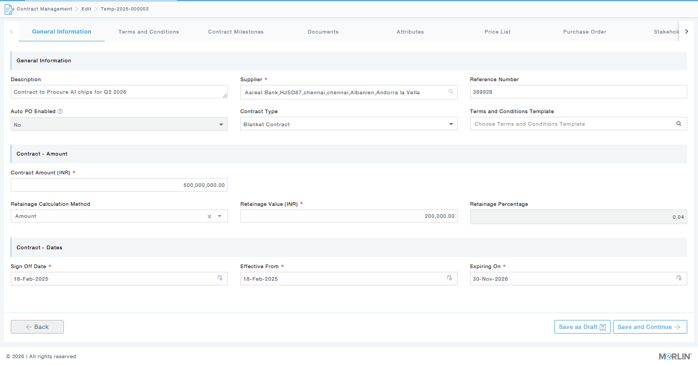
Description of Fields
| Field Name | Description / Purpose | Field Length |
| Description | Brief the purpose of the contract | 1000 |
| Supplier | Choose a supplier from the Supplier List | |
| Reference Number | Enter a reference number if any | 100 |
| Contract Type | Defines the Type of Contract- Rate Contract/Blanket Contract
Rate Contract: A rate contract is a pre-negotiated agreement that establishes a fixed price or rate for specific goods or services over a defined period of time. Orders may be placed against this contract as required, without any commitment to a minimum or maximum quantity, making it suitable for items where demand is irregular or difficult to forecast in advance. Blanket Contract: A blanket contract is a long-term procurement agreement that commits to purchasing a predetermined quantity of goods or services from a designated supplier within a specified timeframe. This contract type streamlines the procurement process by consolidating multiple recurring orders into a single agreement, enabling volume-based pricing and ensuring continuity of supply.
|
|
| Auto PO Enabled | Provision to provide Yes/No only if the contract has been created as a result of the sourcing process. If you choose Yes, a PO will be automatically created.
Note: If you are creating a new contract from the Contract Management module, this field will remain non-editable and NO. |
|
| Terms and Conditions Template | Choose the Terms and Conditions associated with the contract. The terms and conditions will be displayed in the adjacent tab. Templates are defined in the Business Administration module. | |
| Contract amount | Total contract amount | |
| Minimum Spend | The minimum amount that can be spent | |
| Maximum Spend | The maximum amount that can be spent | |
| Retainage Calculation Method | The retainage can be calculated based on the Contract amount, percentage, or need not be applicable at all in certain cases. | |
| Retainage Value | If the Retainage Calculation method is applicable, then the Retainage value, either in terms of percentage or absolute value, can be specified | |
| Retainage Percentage | Provide the Retainage Percent. This is enabled only if the Retainage Calculation Method is selected as the percentage | |
| Signed Off | Signed off Date of the contract | |
| Effective From | Contract effective from the date | |
| Expiring On | The expiry date of the contract |
2. The Terms and Conditions tab will display the contents as per the selection made under the Terms and Conditions template under the General Information tab (previous tab). If one or more templates are selected the contents appear one after the other.

3. Click on Add Milestone to add any milestone to the existing list of milestones.
4. The Milestone can be based on two types:
Relative: Here the milestones are specified in terms of an existing milestone.

Absolute: Here the milestones are created for a specific date.

Enter the required details and Click on the Next Button
5. Click on Add documents to add any document to support the contract.

6. Upload the documents and click on Next to proceed.

7. Click on continue to proceed with the contract.
8. Add the attribute to an already existing set of attributes predefined for the contract.
9. Enter the details of the attribute and click on next to continue.

10. In the price list screen, you will be able to list of prices of Items with all the related details of the item. Download the template and fill in the required details and upload it . There is provision to download Catalogue and Non Catalogue template, update the same and get them added to the Pricelist tab. For blanket contract you can specify the Minimum and Maximum Quantity in the file.
Note: For Contracts created through Award Management, the Pricelist details are updated by default from the Award.
11. On clicking Continue, we are directed to the Purchase Order screen, where we can see the list of purchase orders, if any.

12. On clicking Continue, we get to see the Stakeholders screen. Click on Add Stakeholder to add any stakeholder to this contract.
The Buyer and these Stakeholders will be notified about the expiry dates of the Insurance and will be sent an email notification.

13. Select the role, type and the stakeholder and click on Next.

14. Under the Alerts and Notifications, select Add Alerts to add notifications to the contract to the respective stakeholders.

15. Enter the conditions for the alerts as requested in the pop-up screen and click on next to save the details. The Alert can be either based on milestones or attributes.

16. In the Approvals tab, you can add the Approvers and submit the Purchase Order for Approval.
